Best Barber Tools for a Burst Fade Haircut (Complete Guide)
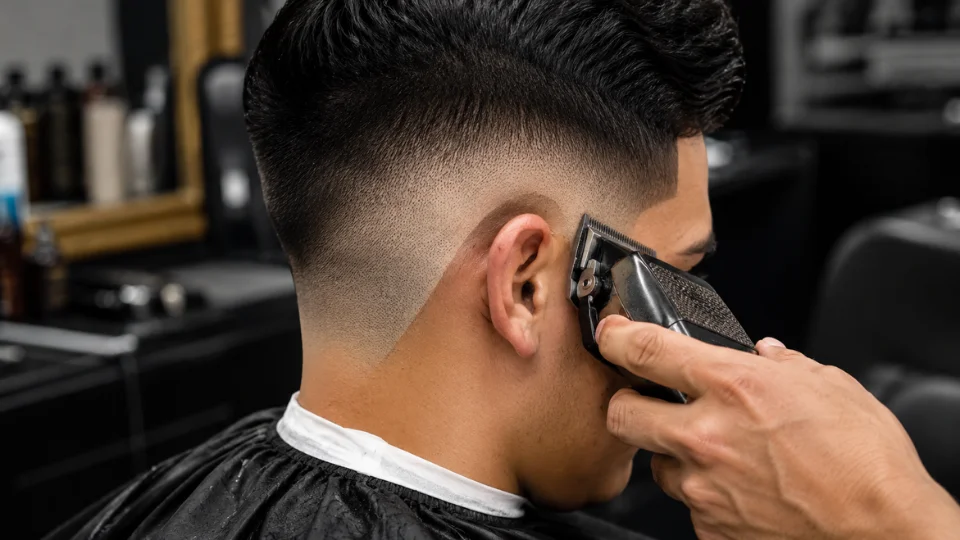
Barber tools are the foundation of every clean burst fade. Even the best barber cannot create a sharp fade without the right clippers, trimmers, guards, and combs. Using the wrong tools can turn a clean burst fade into an uneven, messy haircut.
Most guides online just list a few products and move on. This guide is different. We will walk through every barber tools you need, why each one matters, and how to actually pick the right size and type for your own head shape or your client’s hair. By the end, you will know exactly what to buy, what to skip, and how to keep your gear working well for years.
In this guide, you will learn every tool you need for a burst fade. This includes clippers, trimmers, combs, and a few small extras that make a big difference. You will also learn how to pick the right blade size, how to care for your barber tools, and how to build a simple kit if you want to try a burst fade at home.
Let’s start with why your barber tools matter so much.
Quick Answer
For a burst fade, you need clippers (main cutting), trimmers (edges and hairline), a fade comb (blending), clipper guards (guard sizes 0–4 for the curve), a cape, and a neck duster. Clippers and trimmers matter most, invest in those first.
Why the Right Tools Matter for a Burst Fade
A burst fade is not a straight line. It curves around the ear like a half-circle, or a “burst.” This curve is harder to cut than a regular burst fade or a straight fade. It needs steady hands and sharp barber tools.
Think about it like drawing a curved line versus a straight one. A straight line is forgiving. Small wobbles do not stand out much. But a curved line shows every shake of your hand. That is exactly what happens with a burst fade. The curve around the ear has to stay smooth from top to bottom, and dull or low-quality barber tools make that curve much harder to control.
If your clippers are dull, the blend will look choppy. If you use the wrong guard, the fade will look uneven. Even small mistakes show up fast on a burst fade because the style is so detailed.
I have cut hundreds of burst fades. The ones that came out best were never the ones I rushed. They were the ones where I had clean, sharp tools and took my time on the blend. Good barber tools do not just make the cut look better. They make the whole process faster and easier too. When your gear works the way it should, you spend less time fighting the hair and more time shaping the fade.
There is also a cost side to this. Cheap barber tools might save you money at first, but they wear out fast and can damage hair or skin if the blades pull instead of cut. Spending a bit more upfront on solid, reliable tools usually saves money in the long run, because you are not replacing them every few months.
Now let’s look at the tools you actually need.
The 6 Essential barber tools for a Burst Fade
You do not need a huge collection of gear to cut a great burst fade. You need the right pieces, and you need to know how to use them. Here are the six tools that matter most.
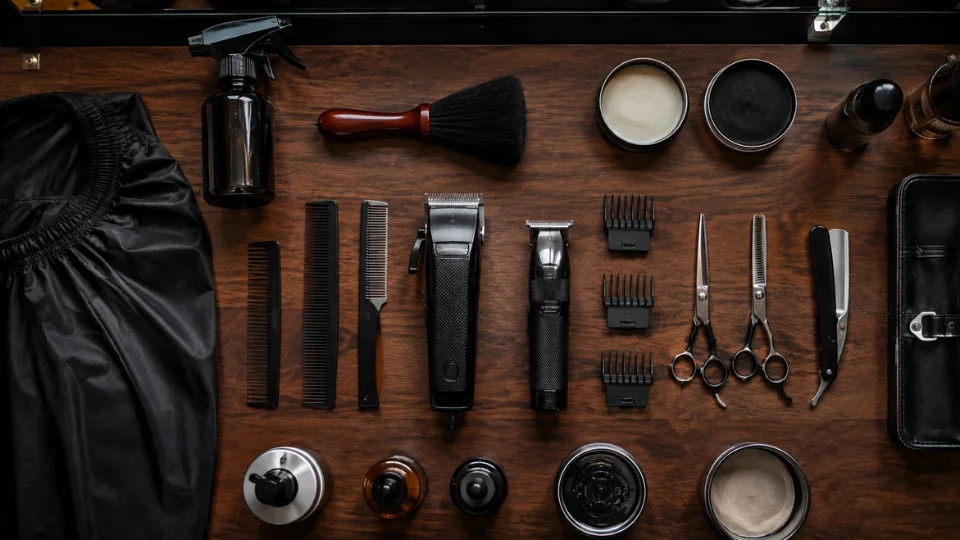
Clippers
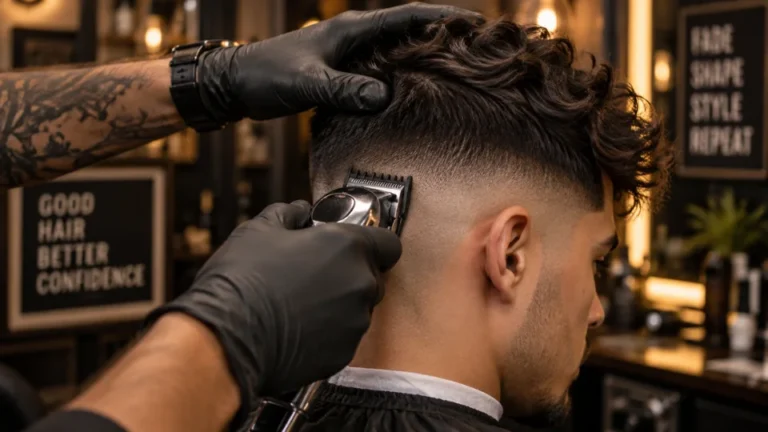
Clippers are your main tool. They do most of the cutting work, from the bulk of the fade to blending the burst shape around the ear. A good pair of clippers should feel balanced in your hand and cut smoothly without pulling hair.
Look for clippers with a strong motor and sharp blades. Cheap clippers often struggle on thick hair and can leave your fade looking patchy. A weak motor also means the clippers slow down when they hit thick spots, which forces you to go over the same area again and again. That extra passing can create uneven patches in the fade instead of a smooth blend.
Weight matters too. Clippers that feel too heavy can tire your hand out during a long cut, which makes it harder to keep a steady line around the burst curve.
Trimmers
Trimmers are smaller and more precise than clippers. You use them for the fine details, like sharpening the hairline, cleaning up around the ears, and edging the burst shape. A burst fade lives or dies on these small details, so a good trimmer matters just as much as good clippers.
A good trimmer should have a narrow blade so it can get into tight spots, like right along the hairline or around the ear where the burst curve starts. Some trimmers also come with adjustable blade settings, which give you more control over how close the cut is.
Fade Combs / Blending Combs
A fade comb helps you blend the different lengths in a fade so there is no hard line between them. This is what makes a fade look smooth instead of choppy. For a burst fade, a good comb helps you follow the curve around the ear.
Most fade combs have flexible teeth that bend with the shape of the head. This flexibility is important for a burst fade because the curve is not flat like a straight fade line. A stiff comb can miss small areas along the curve, leaving faint lines in the blend.
Clipper Guards & Blade Attachments
Guards (also called attachments) clip onto your clippers to control how much hair they leave behind. Different guard numbers leave different lengths. You will use several guard sizes on one burst fade to create the fade effect, from short at the bottom to longer on top.
A full guard set usually includes several sizes, often numbered 0 through 8. For a burst fade, you will likely use at least three or four different guards in one haircut to build a smooth transition. Cheap plastic guards can crack or shift during a cut, so look for a snug, secure fit.
Barber Cape
A cape keeps loose hair off your client (or yourself, if you are cutting at home). It sounds simple, but a cheap cape that lets hair through the neck can make the whole experience uncomfortable. A snug, well-made cape is worth the small extra cost.
Look for a cape with a comfortable, adjustable neck closure and a material that resists static. Static can make loose hair stick to the fabric and eventually fall through, which is annoying for both the barber and the client.
Neck Duster & Talc
After the cut, loose hair sits on the neck and can be itchy. A neck duster brush with a bit of talc powder sweeps this away fast. It is a small tool, but it makes the finished cut feel clean and professional.
A soft-bristle duster works best because it will not irritate the skin. Talc powder also helps absorb sweat and makes the final brush-off feel smoother. This last step is quick, but it is often what makes a haircut feel truly finished.
Clippers vs. Trimmers — What’s the Difference?
A lot of people ask if they really need both clippers and trimmers. The answer is yes, and here is why.
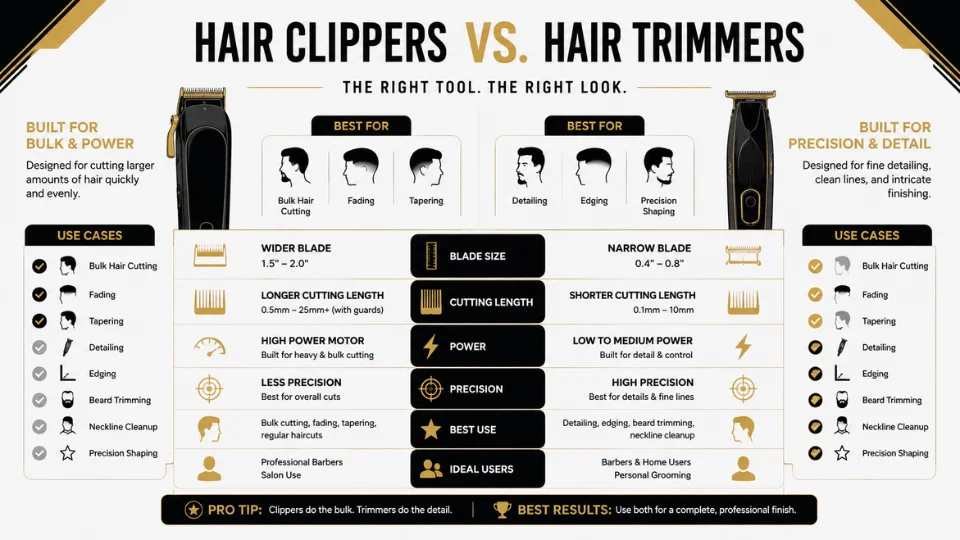
Clippers are built for speed and volume. They cut through thick hair fast and handle the bulk of your burst fade, like fading the sides and blending the burst curve.
Trimmers are built for precision. Their blades are smaller and thinner, made for detail work like sharp hairlines, clean edges around the ears, and neckline cleanup.
Think of it this way: clippers shape the haircut, and trimmers finish it. Skipping trimmers means your burst fade might look good from far away but messy up close.
A lot of beginners try to do everything with one tool to save money. This usually backfires. Clippers are too bulky for a crisp hairline, and trimmers are too slow to fade a whole head. Using each tool for the job it was built for is what separates a clean, professional-looking burst fade from a rough, DIY-looking one.
How to Pick the Right Blade Size for Your Fade
Clipper guards come in numbers, usually from 0 to 8. The lower the number, the shorter the hair it leaves. A 0 guard cuts almost down to the skin. An 8 guard leaves over an inch of hair.
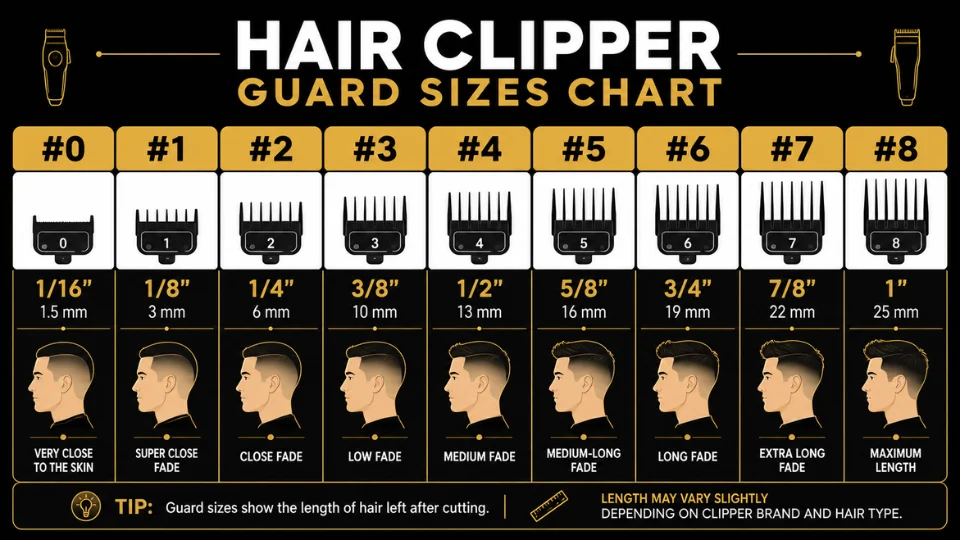
For a burst fade, you usually need a few different guard sizes:
- Low burst fade: starts very short near the skin, using a 0 or 1 guard at the bottom
- Mid burst fade: starts a bit higher, often using a 2 or 3 guard at the base
- High burst fade: starts even higher up the head, using a 3 to 4 guard at the base
If you are not sure which style fits you best, our guides on the low burst fade, mid burst fade, and high burst fade explain each one in detail.
Picking the wrong guard size is one of the most common mistakes beginners make. Going too short too fast can ruin the fade and force you to start over with a shorter style than planned. Always start with a longer guard and go shorter step by step.
A simple rule that helps: work from the bottom up, and blend between each guard change instead of jumping straight from a 0 to a 3. Cutting a small transition line with each guard, then brushing it out with a fade comb, is what creates that smooth burst curve instead of visible steps or lines.
For exact cutting lengths per guard number, refer to Wahl’s guard size chart.
Corded vs. Cordless Clippers, Which Is Better for Fades?
Both types of clippers can cut a great burst fade. The choice comes down to what you need.
Corded clippers plug into the wall and never lose power. They tend to have stronger motors, which helps a lot on thick or coarse hair. The downside is the cord can get in your way while you move around the head.
Cordless clippers run on a battery, so you can move freely. This makes it easier to get the right angle for the curved burst shape. The downside is battery life. If the clippers die halfway through a cut, you have a problem.
Many barbers keep both on hand. Corded for tough jobs, cordless for detailed work and comfort. If you can only buy one, think about how you plan to use it. If you are cutting your own hair at home in front of a mirror, cordless usually feels easier because you are not managing a cord while turning your head. If you are cutting client after client in a shop, a strong corded set (or a high-quality cordless with long battery life) keeps you moving without interruptions.
One thing to watch with cordless clippers is battery health over time. Like any rechargeable tool, the battery will hold less charge after a year or two of daily use. Some cordless clippers let you swap batteries, which is worth looking for if you plan to use them often.
Budget Tools vs. Professional barber tools, Do You Need to Upgrade?
Not everyone needs top-of-the-line gear right away. If you are just starting out or only cutting your own hair at home, a budget set can work fine for basic fades.
But if you are cutting hair often, for clients or for family and friends, it is worth investing in professional barber tools. Professional clippers usually have stronger motors, sharper blades, and longer battery life.
The biggest sign you have outgrown budget tools is when your clippers start pulling hair, overheating, or slowing down mid-cut. That is when the upgrade pays for itself.
Price is not the only thing to compare. Look at motor type, blade material, and how easy replacement parts are to find. A slightly more expensive pair of clippers with a strong motor and steel blades will usually outlast two or three cheaper pairs bought back to back. Over a year of regular use, that often works out cheaper in total, not more expensive.
How to Take Care of Your Barber Tools
Good barber tools do not stay sharp forever if you do not take care of them. A few small habits keep your clippers and trimmers cutting clean for years.
- Oil your blades often. A drop or two of clipper oil after every few cuts keeps the blades gliding smoothly.
- Clean after every cut. Loose hair builds up in the blades and slows the motor down over time.
- Store them dry. Moisture causes rust, and rust ruins blades fast.
- Check the blade edge. If your clippers start pulling hair instead of cutting clean, the blade may need sharpening or replacing.
One habit I picked up early was oiling my clippers before every single client, not just when they felt slow. It only takes a few seconds, but it means the blades are always ready to perform, and I never have to stop mid-cut to fix a dragging blade. Small habits like this add years to your tools.
It also helps to keep a soft brush nearby to clear out loose hair between guard changes. A quick brush-out prevents hair from packing into the blade teeth, which is one of the most common reasons clippers start to feel weak over time.
Building a DIY Burst Fade Kit for Home Use
You do not need a full barbershop setup to try a burst fade at home. A simple starter kit covers the basics:
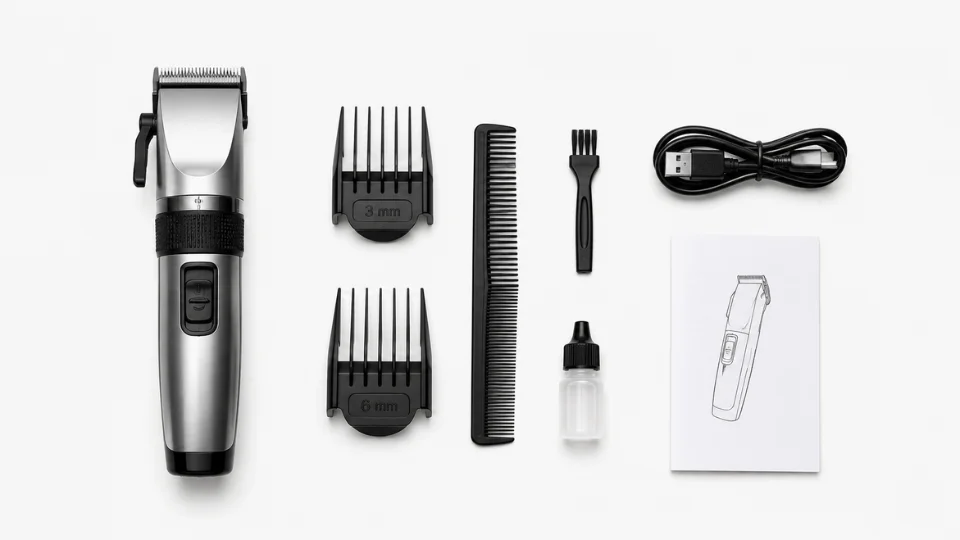
- A solid pair of clippers with multiple guard sizes
- A small trimmer for edges and the hairline
- A basic fade comb for blending
- A cape and neck duster for cleanup
Recommended kit: The Wahl Clipper Rechargeable Cord/Cordless Haircutting & Trimming Kit bundles most of this list into one purchase, clippers, trimmer, guards, comb, and scissors, making it an easy starting point if you don’t want to buy everything separately.
Start simple. You can always add more barber tools once you get comfortable with the basics. Trying to buy every tool a professional barber owns before your first cut is not necessary, and it can even make things more confusing. Learn the basics with a small kit first.
If you are cutting your own hair or a family member’s hair for the first time, practice the blend on a longer guard before going shorter. It is much easier to fix a fade that is too long than one that is already too short. Take your time, work in small sections, and check the blend from a few angles before moving to the next guard size.
Frequently Asked Questions
Final Thoughts
A great burst fade comes down to two things: skill and barber tools. You can practice the technique all you want, but dull clippers or the wrong guard size will still hold you back. Start with the essentials, clippers, trimmers, a fade comb, guards, a cape, and a neck duster, and take care of them so they last.
If you are just getting started, do not feel like you need to buy everything at once. Begin with a solid set of clippers and a trimmer, learn how to blend with a few guard sizes, and add the smaller extras as you go. Even professional barbers built their kits piece by piece over time.
Whatever stage you are at, the goal is the same: sharp barber tools, steady hands, and a little patience on the blend. Get those three things right, and a clean burst fade is well within reach.
More guides in this series are coming soon, covering clippers, trimmers, fade combs, clipper guards, barber capes, neck dusters, clippers vs trimmers, corded vs cordless clippers, budget vs professional barber tools, clipper maintenance, blade sharpening, blade sizing, and DIY home kits.
Want to build your complete barber tools kit? Read our related guides on Hair Clippers vs. Hair Trimmers, Clipper Guard Sizes Chart, Best Hair Clippers for Beginners, Corded vs. Cordless Clippers, How to Clean & Maintain Hair Clippers, Best Fade Combs, Barber Cape Guide, and DIY Home Haircut Starter Kit.
About Ryan Carter
Men’s Hairstyle Writer & Grooming Content Specialist
Ryan Carter is a men’s hairstyle writer and grooming content specialist at BurstFadeBlog.com, specializing in burst fade haircuts, fade variations, and modern men’s hairstyles. He researches professional barbering techniques, current hairstyle trends, and trusted grooming resources to create practical, easy-to-follow haircut guides. Ryan regularly reviews and updates his articles to ensure every guide remains accurate, up to date, and genuinely helpful for readers planning their next visit to the barber.
All articles published on BurstFadeBlog.com follow our editorial standards and are reviewed regularly to ensure accuracy, freshness, and reader value.